ruoyi-vue-plus之pom文件
SpringBoot的pom文件配置解析
文档地址:点击这里
项目地址:点击这里
profiles.profile
下面是本项目的ruoyi-admin(父类)的pom文件profiles.profile
<profiles>
        <profile>
            <id>local</id>
            <properties>
                <!-- 环境标识,需要与配置文件的名称相对应 -->
                <profiles.active>local</profiles.active>
                <logging.level>info</logging.level>
            </properties>
        </profile>
        <profile>
            <id>dev</id>
            <properties>
                <!-- 环境标识,需要与配置文件的名称相对应 -->
                <profiles.active>dev</profiles.active>
                <logging.level>info</logging.level>
            </properties>
            <activation>
                <!-- 默认环境 -->
                <activeByDefault>true</activeByDefault>
            </activation>
        </profile>
        <profile>
            <id>prod</id>
            <properties>
                <profiles.active>prod</profiles.active>
                <logging.level>warn</logging.level>
            </properties>
        </profile>
    </profiles>
标签 <profiles.active></profiles.active>
在开发项目的过程中,通常一个项目会对应着多个不同的环境,例如测试、开发、生产。其中每个环境的配置可能都不一样,因此在父pom文件引入<profiles.active></profiles.active>能方便我们进行环境的切换。每一个<profiles.active></profiles.active>对应不同的环境,每个环境对应不同的配置文件(application)。在maven中可以勾选对应的环境。
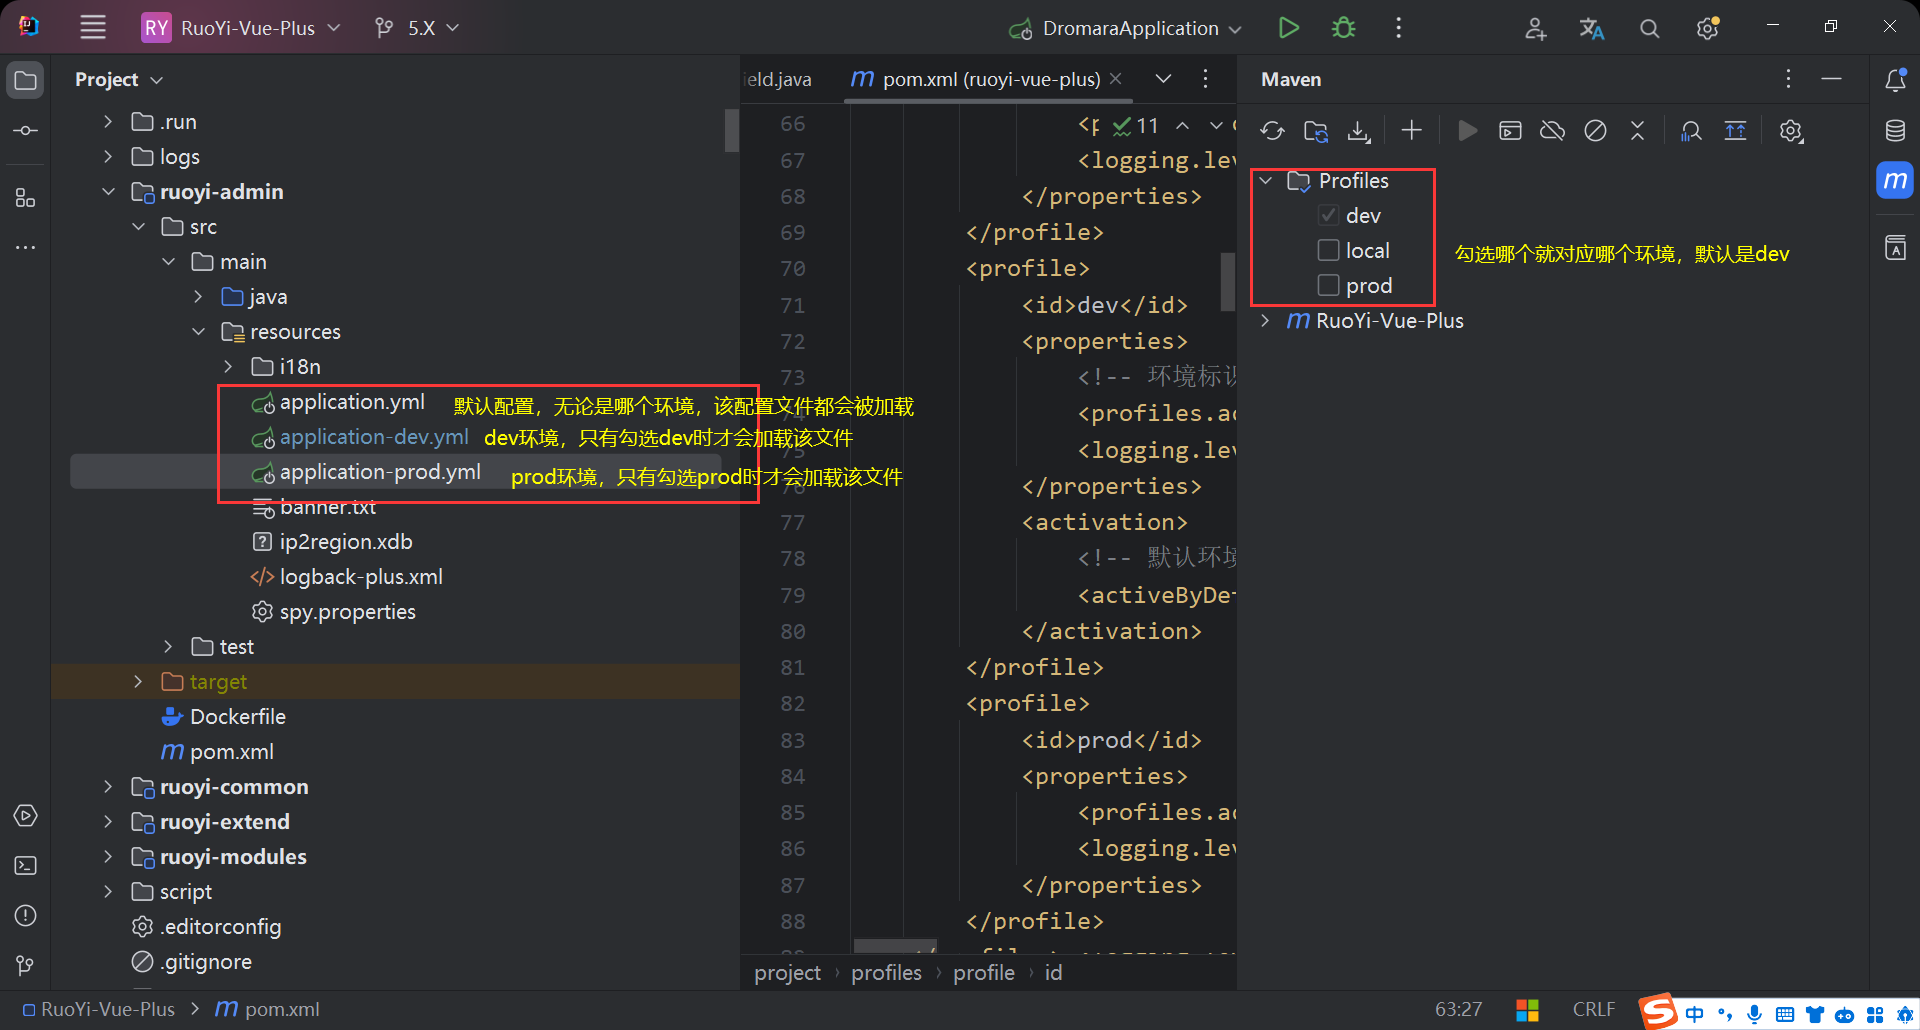
注意:配置环境一定是要application-开头,加上<profiles.active></profiles.active>中的内容,例如 <profiles.active>dev</profiles.active>就对应着application-dev
标签 <logging.level></logging.level>
表示日志级别,日志打印对应着8中形态,级别顺序为:
ALL < TRACE < DEBUG < INFO < WARN < ERROR < FAIL < OFF
假设当前设置的日志级别是INFO,那么控制台以及日志文件只会显示info,warn,erroe,fail,off级别的日志,也就是只会显示日志级别大于等于info的日志,小于等于info的日志则不会显示在控制台以及日志文件中。
modules和packaging
modules
modules下声明的是子模块,没有子模块则不用声明。
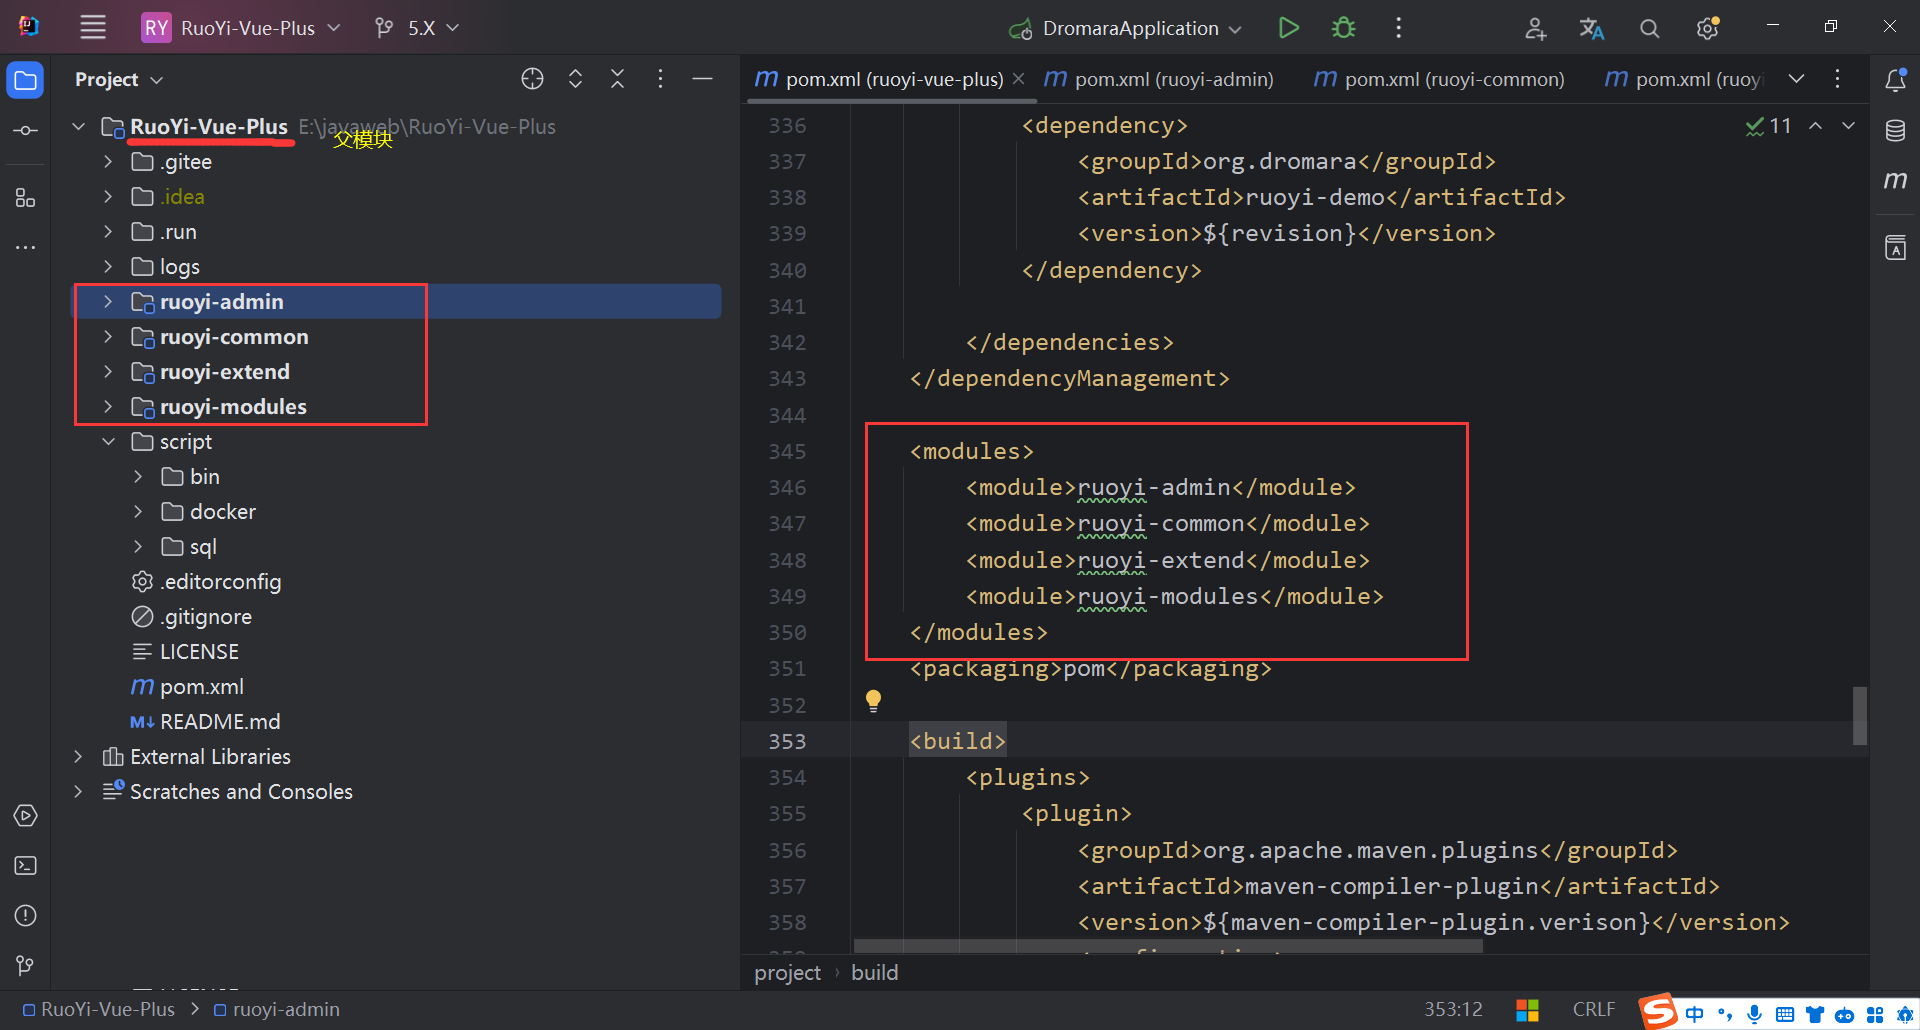

packaging
packaging意为打包方式,本身是父模块(父pom文件)时,打包方式为pom,这样子模块之间才能进行依赖传递。如果自身是非父模块,则使用jar方式进行打包。pom的意思是项目里没有java代码,也不执行任何代码,只是为了聚合工程或传递依赖用的。所以并不会寻找配置文件,若想配置文件生效,改为jar。如果没设置打包方式,默认是jar.
build
plugins
plugins引入的插件其实是本地仓库的一个jar包,<configuration>用来补充插件的配置信息。<annotationProcessorPaths>它用于指定在编译过程中使用的注解处理器的路径。这些处理器可以根据源代码的注解生成额外的代码或者执行各种任务。
<build>
    <plugins>
        <plugin>
            <groupId>org.apache.maven.plugins</groupId>
            <artifactId>maven-compiler-plugin</artifactId>
            <version>${maven-compiler-plugin.verison}</version>
            <configuration>
                <source>${java.version}</source>
                <target>${java.version}</target>
                <encoding>${project.build.sourceEncoding}</encoding>
                <annotationProcessorPaths>
                    <path>
                        <groupId>com.github.therapi</groupId>
                        <artifactId>therapi-runtime-javadoc-scribe</artifactId>
                        <version>${therapi-javadoc.version}</version>
                    </path>
                    <path>
                        <groupId>org.projectlombok</groupId>
                        <artifactId>lombok</artifactId>
                        <version>${lombok.version}</version>
                    </path>
                    <path>
                        <groupId>org.springframework.boot</groupId>
                        <artifactId>spring-boot-configuration-processor</artifactId>
                        <version>${spring-boot.version}</version>
                    </path>
                    <path>
                        <groupId>io.github.linpeilie</groupId>
                        <artifactId>mapstruct-plus-processor</artifactId>
                        <version>${mapstruct-plus.version}</version>
                    </path>
                    <path>
                        <groupId>org.projectlombok</groupId>
                        <artifactId>lombok-mapstruct-binding</artifactId>
                        <version>${mapstruct-plus.lombok.version}</version>
                    </path>
                </annotationProcessorPaths>
                <!-- 用于指示编译器保留方法的参数名称,这在使用反射或生成文档时非常有用 -->
                <compilerArgs>
                    <arg>-parameters</arg>
                </compilerArgs>
            </configuration>
        </plugin>
        <!-- 单元测试使用 -->
        <plugin>
            <groupId>org.apache.maven.plugins</groupId>
            <artifactId>maven-surefire-plugin</artifactId>
            <version>${maven-surefire-plugin.version}</version>
            <configuration>
                <!-- 根据打包环境执行对应的@Tag测试方法 -->
                <groups>${profiles.active}</groups>
                <!-- 排除标签 -->
                <excludedGroups>exclude</excludedGroups>
            </configuration>
        </plugin>
        <!-- 统一版本号管理 -->
        <plugin>
            <groupId>org.codehaus.mojo</groupId>
            <artifactId>flatten-maven-plugin</artifactId>
            <version>${flatten-maven-plugin.version}</version>
            <configuration>
                <!-- true:在执行flatten时会更新pom文件 -->
                <updatePomFile>true</updatePomFile>
                <!-- 操作模式 -->
                <flattenMode>resolveCiFriendliesOnly</flattenMode>
            </configuration>
             <!-- 在某个生命周期执行一些目标 -->
            <executions>
                <execution>
                    <id>flatten</id>
                     <!-- 生命周期 -->
                    <phase>process-resources</phase>
                    <goals>
                         <!-- 执行目标 -->
                        <goal>flatten</goal>
                    </goals>
                </execution>
                <execution>
                    <id>flatten.clean</id>
                    <phase>clean</phase>
                    <goals>
                        <goal>clean</goal>
                    </goals>
                </execution>
            </executions>
        </plugin>
    </plugins>
</build>
resources
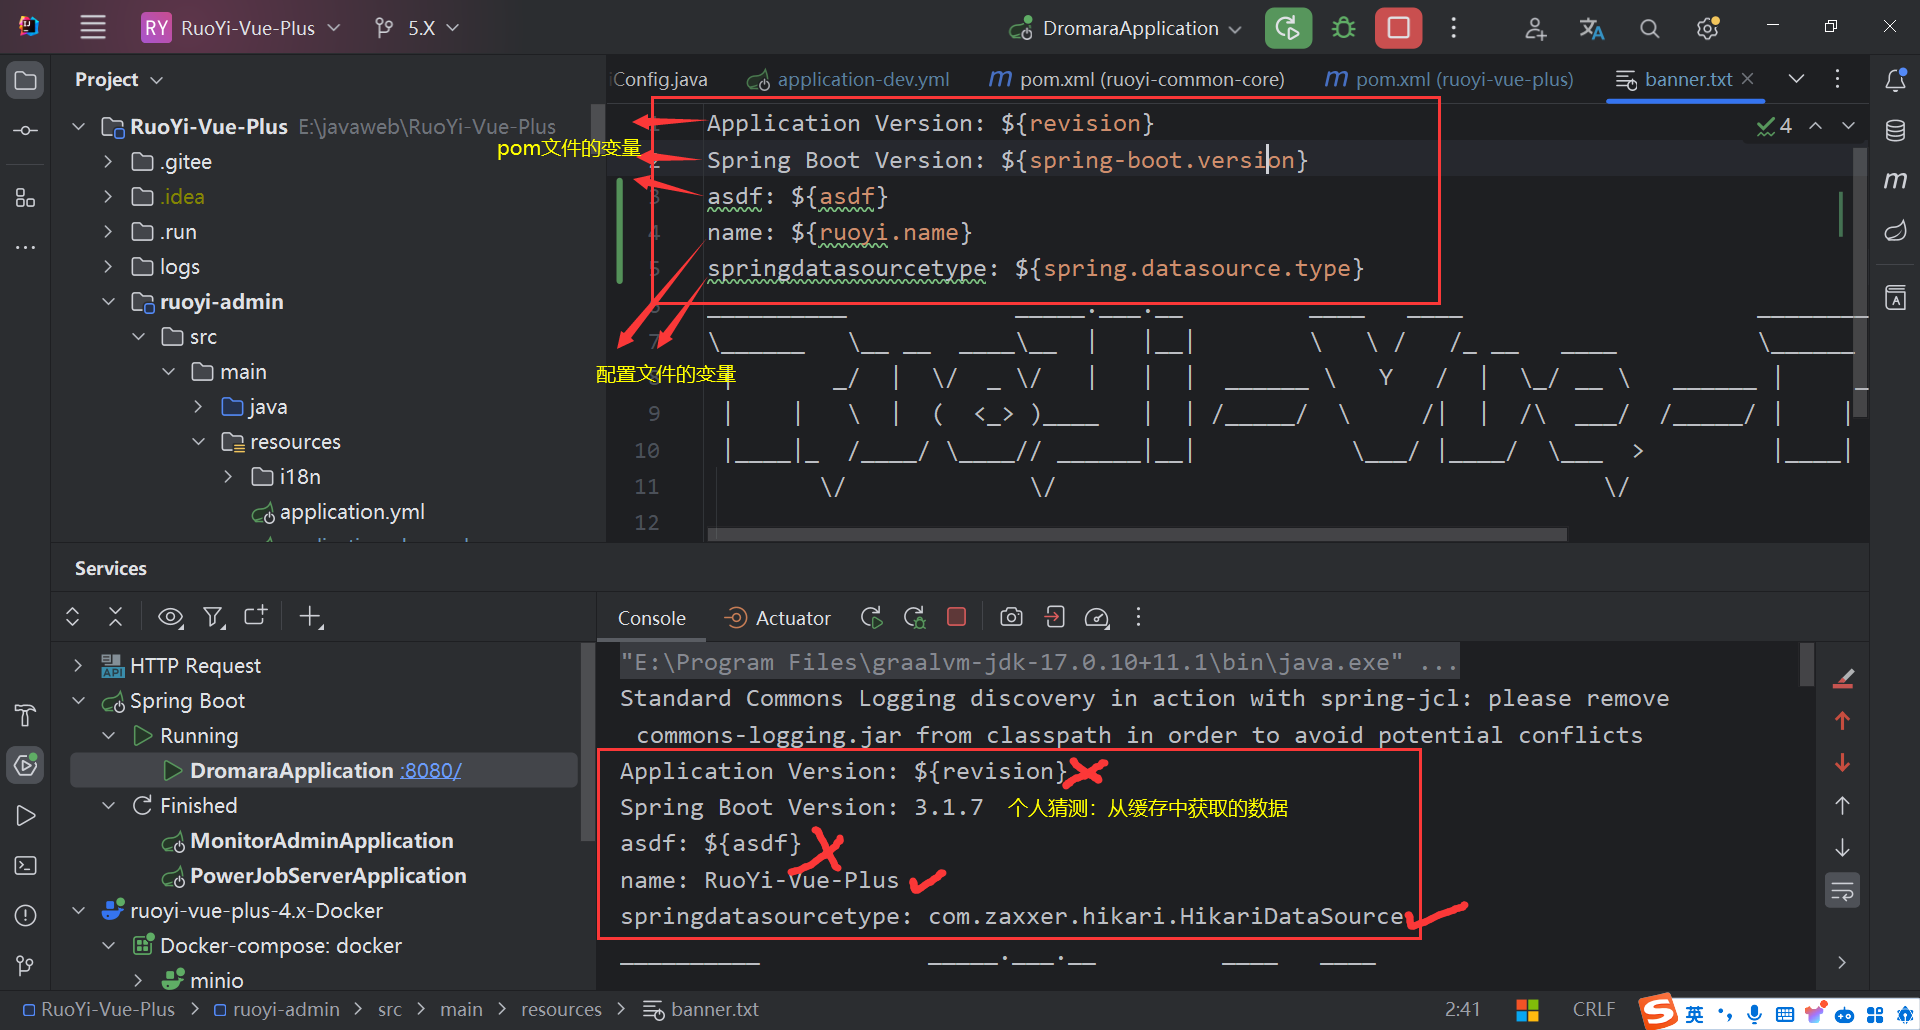
在Maven中,“过滤”通常指的是再复制资源文件到输出目录(如编译后的目录)之前,将文件中的特定标记和占位符替换为预定的值。例如banner.txt文件下Application Version: ${revision},${revision}会被替换。
<resources>
    <resource>
        <directory>src/main/resources</directory>
        <!-- 关闭过滤 -->
        <filtering>false</filtering>
    </resource>
    <resource>
        <directory>src/main/resources</directory>
        <!-- 引入所有 匹配文件进行过滤 -->
        <includes>
            <include>application*</include>
            <include>bootstrap*</include>
            <include>banner*</include>
        </includes>
        <!-- 启用过滤 即该资源中的变量将会被过滤器中的值替换 -->
        <filtering>true</filtering>
    </resource>
</resources>当我把<include>banner*</include>注释后,运行程序,控制台打印如下:
repositories和pluginRepositories
<repositories>
        <repository>
            <!-- 唯一标识 -->
            <id>public</id>
            <!-- 可读名称 -->
            <name>huawei nexus</name>
            <!-- url地址 -->
            <url>https://mirrors.huaweicloud.com/repository/maven/</url>
            <releases>
                <!-- 表示允许从该仓库获取发布版(即稳定版)的依赖 -->
                <enabled>true</enabled>
            </releases>
        </repository>
    </repositories>

    <pluginRepositories>
        <pluginRepository>
            <id>public</id>
            <name>huawei nexus</name>
            <url>https://mirrors.huaweicloud.com/repository/maven/</url>
            <releases>
                <enabled>true</enabled>
            </releases>
            <!-- 表示不允许从该插件仓库获取快照版(即开发版)的插件 -->
            <snapshots>
                <enabled>false</enabled>
            </snapshots>
        </pluginRepository>
    </pluginRepositories>
参考
本文参考了大佬们的文章:
日志级别:点击这里
packaging:点击这里